Whether it's for Thanksgiving, Christmas or another special occasion, figuring out how to cook a ham can be a daunting task. But it doesn't have to be! Cooking ham is simple, so long as you know what kind you’re working with. Whether you bake, glaze or smoke it, discover the best way to cook a ham with us!
What is Ham?
Ham usually refers to the hind leg of a pig, which is often salted or smoked. It can be bought, cooked and served in a number of different ways, with some including the whole bone and leg, while others are sliced into wafer-thin pieces. Some are cured and cooked, whereas others are raw and uncured. They can come whole, with essentially all of the leg except the foot, or you can purchase a half ham, from either the top half (butt end) or bottom half (shank) of the leg.
Pre-cooked
The majority of store-bought hams are pre-cooked, having been wet-cured and then smoked or boiled. Since this is cooked, you can serve it as is, but cooking it again can yield a deliciously tender, rich meat feast.
Country-Cured / Dry-Cured
These hams have been salt-cured, smoked and aged, resulting in a dry but very flavorful delicacy. People tend to eat less of it because of its saltiness, so you may need to purchase less than with other varieties. This can be eaten like prosciutto, raw and trimmed off the bone in wafer-thin slices.
Fresh (uncured, raw)
This is best obtained from a butcher, though some grocery stores may provide it too. Since it has not been cooked, baked, cured or smoked at all, it'll take considerably longer to cook.
City Ham
Also known as a prepared ham, is the most common type of ham found in grocery stores. It is typically wet-cured, meaning it has been soaked in a brine solution, and is fully cooked. They can be either smoked or unsmoked. This type of ham is often pre-sliced in a spiral cut for easy serving. Because it is already cooked, it can be eaten straight out of the package, but it is usually reheated and glazed to enhance its flavor and presentation.
City hams are popular for their convenience and versatility. They are ideal for holiday meals and large gatherings due to their ease of preparation. You have the option of choosing between bone-in and boneless varieties - while bone-in hams are generally considered to have more flavor and moisture, boneless are easier to carve and serve.
Boneless
A boneless ham is exactly what it sounds like: a ham from which the bone has been removed. This type is often processed into a compact, oval shape, making it easier to slice and serve. The texture of boneless ham is typically smoother and more uniform compared to bone-in ham, and it resembles the texture of deli-style know and love.
While boneless ham is convenient and simple to carve, it can sometimes lack the depth of flavor and juiciness that bone-in hams possess. The bone in a bone-in ham helps retain moisture and adds a richer flavor during cooking. However, boneless varieties are popular for their ease of preparation and serving, making them a great choice for those who prefer a hassle-free cooking experience.
How to Pick the Perfect Ham: Tips and Tricks
Know Your Types
- City: Pre-cooked and brined, often smoked or boiled. Ideal for a straightforward, no-fuss preparation.
- Country: Dry-cured and intensely flavored, similar to prosciutto. Best for those who enjoy a more robust taste.
- Fresh: Uncured and uncooked, offering a blank canvas for your seasoning and cooking techniques.
Bone-In vs. Boneless
- Bone-In: Generally more flavorful and juicy, thanks to the bone which helps retain moisture during cooking.
- Boneless: Easier to carve and serve, with a uniform texture. Great for convenience, but may lack the depth of flavor found in bone-in varieties.
Consider the Cut
- Shank End: Leaner with a single, easier-to-carve bone. It has a slightly sweeter flavor.
- Butt End: Meatier with more fat, which can provide a richer taste but may have a more complex bone structure to navigate when carving.
Check the Label
- Water Content: Look for labels indicating "water added" or "natural juices." Less added water generally means a more concentrated flavor.
- Curing Method: Whether wet-cured or dry-cured, the curing method can affect the taste and texture. Wet-cured are typically milder, while dry-cured hams are saltier and more robust.
Size Matters
- Portion Control: Estimate about ¾ to 1 pound of bone-in ham per person, and about ½ pound of boneless ham per person.
Thawing the Ham
You can cook ham frozen but it will need to spend a longer time in the oven, so we recommend thawing it first.
In The Fridge
The safest way to thaw is in the refrigerator. Wrap your ham, and leave it in your refrigerator at a temperature of 25 - 40 F. Store it on a plate or tray that can catch any liquid it releases as it thaws.
Thaw for around 5 or 6 hours. Larger roast hams may take up to 7 or 8 hours. Once thawed, it can safely be kept in the refrigerator for 3 to 5 days. It can also be refrozen during this time, but be aware it may lose some texture and flavor quality.
In Cold Water
Another way to thaw is to thaw it in cold water. This is faster than in the refrigerator but requires greater care.
Fill your sink with cold water (do not use warm or hot water, as it may encourage the growth of bacteria). Put your ham in a sealed plastic bag and submerge it entirely in the water. Make sure no water can get into the bag, as this will hamper (excuse the pun!) the meat and potentially introduce bacteria.
Leave this way for around 3 hours. Larger hams may take an additional hour or two.Once thawed, it should be cooked immediately. Do not refrigerate or refreeze meat thawed using this technique.
Glazing the Ham
This is another step you can potentially skip, but if you do want to make it extra-delicious as well as attractive, adding a glaze is a no-brainer. Some will come with a glaze packet included, but it’s easy to throw together a glaze of your own.
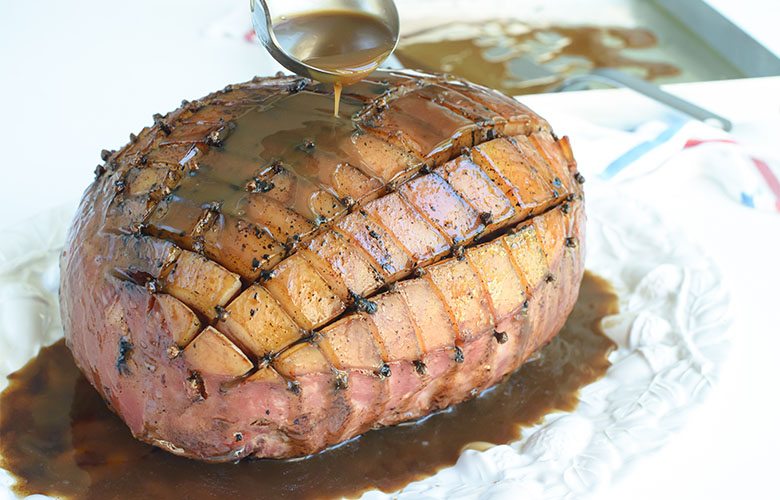
You’ll find glaze ideas in cook books and online, but it’s pretty easy to make one from scratch using whatever ingredients are on hand. Usually a glaze will combine the juice of a fruit (such as orange, pineapple or peach) with seasonings like ginger, mustard, rosemary or cinnamon. Honey and brown sugar are also common additions. Of course, you’re free to think outside the box and incorporate anything from marmalade to maple syrup to ginger beer to coca cola! The key is to keep it relatively simple: 4 or 5 ingredients should suffice. Sweet glazes are best-suited to wet-cured, non-salty hams, whereas tangy, sour or savory glazes are best with salted hams.
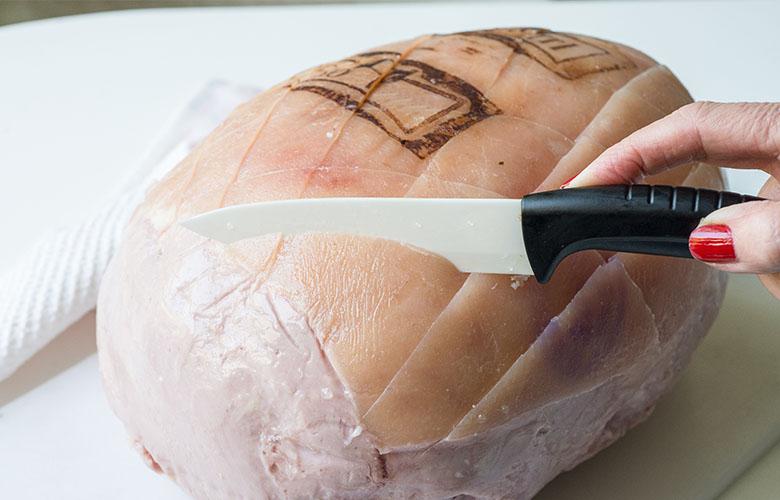
You can glaze before even placing it in the oven, but the flavors may be stronger if you do it 30 minutes before the ham has finished cooking. Simply remove from the oven, use a knife to score it with a grid-like pattern (this looks pretty and also helps the glaze penetrate the heart of the meat), and then apply the glaze using a spoon or brush. Then return to the oven and cook until it acquires a gorgeously golden, shiny crust and an internal temperature of 160 F.
Cooking the Ham
Before starting the cooking process, make sure you have the right equipment. You'll want a sufficiently big tray or pan, and a sharp knife for scoring and serving. An oven-safe thermometer will help you test the internal temperature, making it easier to avoid over or under-cooking, and you'll also want a brush or spoon if you're planning to apply a glaze (see above).
Pre-Cooked
Preheat your oven to 330 degrees, and place your ham in your pan or tray. You can score and glaze it now, or do it 30 minutes before finish time (see above). You may wish to add two cups of water to the pan, creating a steaming effect that penetrates the ham and keeps it from drying out. Cooking time will depend on the size. We recommend cooking around 15 minutes per pound.
Country-cured / Dry-cured
As we mentioned above, dry-cured varieties can be eaten just like prosciutto, by trimming the meat off the bone and eating it in thin slices. You can cook it, in theory, but because it’s already quite dry, you risk turning the meat into overly crisp leather! Some folks, however, like to pan-fry those slices. Soak the slices in water first to moisten them up a bit, place them in the pan and fry for about a minute per side. Be very careful not to overcook! You can also slice country ham into half-inch-thick steaks and grill them, but once again, be very careful not to let them dry out.
Fresh (uncured, raw)
Since fresh ham hasn’t been cured, seasoned or cooked, it’ll require more effort on your part to cook, but it also gives you the freedom to make it your own way, without worrying about which ingredients the manufacturer may have added.
You’ll want to season it before cooking it: score the meat with intersecting lines to form a grid and rub it with salt, pepper and any other seasonings. If you’re planning to use a glaze, apply it a little later, after it has been cooking for half an hour or so, so that the salt and pepper have time to permeate through the skin and meat.
Preheat your oven to 330 F, and cook for about 30 minutes per pound.
How to Broil Ham
Broiling ham is a quick and easy way to achieve a mouthwatering, caramelized finish that adds depth and richness to every bite. Start by preheating your broiler to high—this is where the magic happens! Position the oven rack about 6 inches from the heat source. You'll want a fully cooked ham, ideally pre-sliced to make serving a breeze.
Now, here’s where you can have some fun: brush those ham slices with a glaze that makes your taste buds tingle. Think honey and brown sugar for sweetness, or perhaps a dash of mustard for a tangy kick. Place the glazed ham on a broiler pan or a foil-lined baking sheet to catch all the tasty drippings. .
Pop it under the broiler, and let the intense heat do its work—just 3-5 minutes per side will give you that irresistible crispy edge. Keep a close watch; the high heat can turn from perfect to charred in seconds. Once you see those edges sizzling and browning up beautifully, it’s time to pull the ham out. Let it rest for a couple of minutes to lock in those juices before serving. Whether you're topping a salad or pairing it with eggs, broiled ham brings a delectable, savory crunch that's simply divine. .
How to Cook Ham in a Slow Cooker
- Cooking ham in a slow cooker is like setting up a culinary masterpiece that cooks itself!
- First, select a fully cooked, bone-in ham that fits snugly into your slow cooker—spiral-cut hams work beautifully for this.
- Before placing it in the cooker, score the surface in a diamond pattern to allow your glaze to seep into every nook and cranny.
- Now, let’s talk flavor: create a glaze that sings! A classic mix of brown sugar, honey, Dijon mustard, and a splash of pineapple juice or apple cider will give your ham a mouthwatering sweetness with a tangy twist.
- Pour half of this glaze over the ham, saving the rest for later.
- Set your slow cooker to low and let the ham gently heat for about 4-6 hours. The beauty of the slow cooker is in its patience—slowly coaxing the ham to a tender, juicy finish without drying it out. Halfway through, pour over the remaining glaze, letting it soak in as the ham continues to warm.
When it's done, the ham will be gloriously glazed, tender, and practically falling off the bone. Slice and serve with your favorite sides and watch as everyone digs into this effortlessly delicious feast.
How to Carve
This can be a rewarding experience if done correctly. After allowing your cooked ham to rest, place it on a stable cutting board. If it is bone-in, start by cutting around the bone, freeing up as much meat as possible. Slice against the grain into even pieces to ensure tenderness. For boneless, simply cut into slices of your preferred thickness.
How Long to Cook a Ham
The cooking time depends on its type and size. Pre-cooked varieties generally require about 15 minutes per pound at 330 F. Fresh, uncured types need about 30 minutes per pound. Always use a meat thermometer to ensure it reaches an internal temperature of 160 F for optimal safety and flavor.
Storage Rules: How to Store a Ham
Storing ham properly ensures that every slice stays fresh, flavorful, and ready to enjoy. If your ham is unopened and still vacuum-sealed, simply pop it in the fridge, where it can last up to two weeks, or stash it in the freezer for up to two months. Once you’ve opened the ham, you need to up your storage game a bit. Wrap the leftover slices tightly in plastic wrap, foil, or place them in an airtight container to prevent them from drying out. If you're storing a whole or partial ham, place it in a large zip-top bag or wrap it well in foil and plastic.
Refrigerated cooked ham should be eaten within 3-5 days, so plan your meals accordingly. If you've got more ham than you can handle, freezing is your best friend. Freeze individual slices or the whole portion by wrapping them securely and placing them in a freezer-safe bag—be sure to squeeze out as much air as possible! When you're ready to eat, thaw the ham overnight in the fridge, and then gently reheat to maintain its juicy texture. Storing ham like this keeps the meat fresh and delicious, ready to elevate any dish you have planned.